
Introduction
Welcome to the Clearfacts Developer Documentation.
We offer a public API available to all our users, partners, and app developers.
In this documentation you'll find information on how to authenticate and connect to our API, as well as in depth information on the functionality it exposes.
Technology
- Our API is not a REST API, instead we use the GraphQL specification.
- we'll assume you have a basic understanding of graphql
- but we'll also provide different examples which should help you get started
- For connecting to the API you need a token. These can be
- creating a personal access token
- or through OpenID Connect
Getting help
If you have any questions regarding our API please contact our developer support via email at dev-support at clearfacts dot be.
Using this documentation
Wherever possible, there will be concrete examples provided in the area to the right. For navigation, you can quickly move around using the menu on the left.
GraphQL
What is GraphQL ?
GraphQL is a data query language developed by Facebook in 2012.
It was published in 2015 and has since been adopted by major tech products like GitHub, YouTube or Pinterest to build the most recent versions of their APIs.
GraphQL provides an alternative to REST and allows clients to define the structure of the data required, and exactly the same structure of the data is returned from the server. It is a strongly typed runtime which allows clients to dictate what data is needed. This avoids both the problems of over-fetching as well as under-fetching of data.
More information on GraphQL can be found here (amongst plenty of others):
The GraphQL Endpoint
Where REST has several endpoints, graphQL has just one:
https://api.clearfacts.be/graphql
The Schema
We generate documentation from our GraphQL schema. All calls are validated and executed against the schema. Use these docs to find out what data you can query, and which operations you can execute.
Examples
Throughout this documentation, we'll provide examples where possible.
However, since every GraphQL or HTTP Client library has its own syntax of actually setting the query and/or variables, we only provide the plain GraphQL query or mutation itself. Not the function calls to set them in your library of choice.
Regardless, the end result should be:
- a POST request
- to the GraphQL endpoint
- with the Content-Type header set to application/json or application/graphql
- the Authorization header set to
Bearer <token> - and the body containing
- either the full plain query or mutation (only possible with Content-Type application/graphql)
- or a JSON object with the query/mutation in the
querykey, and variables in thevariableskey
Operations
Authentication
To use our API you need to authenticate using a valid API token that has the right scopes.
When using such a token you will be able to act on behalf of the Clearfacts user for which the token was created.
A token can be acquired in two ways, and we'll break them down in the following sections.
Personal Access Token
A personal access token is created once, manually, by a Clearfacts user. This means that the user needs to log in to the Clearfacts web platform and create the token through the user interface.
This is typically used for offline or desktop applications. For (online) applications used by multiple users, we recommend using OpenID Connect instead.
As a developer, either:
- request a Clearfacts account from an accountant to create your token
- or ask them to create the token for you
Personal access tokens are similar to OAuth2 bearer tokens, but they do not expire.
This means it's an easy way to get a token for talking to the API using command line tools, e.g. while exploring the API's capabilities.
Personal access tokens are always exactly 80 ASCII characters (or bytes) long.
Creating an Personal Access Token
To create a personal access token, you need to follow these steps:
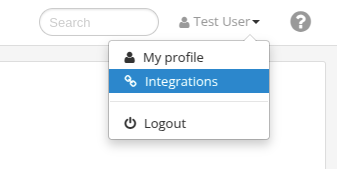
- Log in to the Clearfacts web platform.
- In the top right corner, click on your profile and select "Integrations".
- Click on the button "Create new token".
- Give your token a descriptive name.
- Select the scopes you'd like to grant your token.
- Click the "Save" button
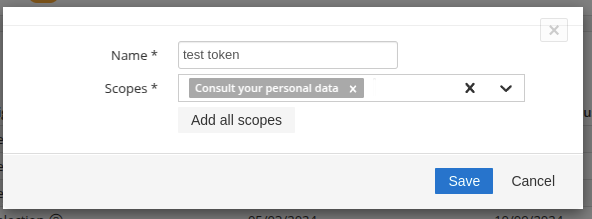
- The newly created token is displayed in a message box. Make sure to copy it, as it is only displayed once.
Testing your token
# Replace `<token>` with your actual personal access token.
curl -H "Authorization: Bearer <token>" \
  -X GET \
  https://login.clearfacts.be/oauth2-server/userinfo
{
  "sub":"user@domain.com",
  "username":"user@domain.com",
  "email":"user@domain.com"
}
You can use a simple curl request to test your token, and information about the user for whom the token was created.
OpenID Connect
If you're a developer and want to enable the users of your application to generate access tokens, effectively granting your application access to Clearfacts on their behalf, then implementing OpenID Connect (OIDC) is the way to go.
OpenID Connect 1.0 is a simple identity layer on top of the OAuth 2.0 protocol. It allows Clients to verify the identity of the user based on the authentication performed by an Authorization Server, as well as to obtain basic profile information about the user in an interoperable and REST-like manner.
Building a secure OpenID Connect client is difficult, so you should use an existing and proven implementation in the language of your choice. Click here for a list of client libraries.
If you're interested in learning more, check out the following link: An intro on OpenID Connect.
Application Registration
In order to use OpenID Connect, your application needs to be registered with Clearfacts. This can now be done through the Clearfacts web platform.
As a developer, either:
- request a Clearfacts account from an accountant to create your application
- or ask them to create the application for you
To create an application, you need to follow these steps:
- Log in to the Clearfacts web platform.
- In the top right corner, click on your profile and select "Integrations".
- Click on the button "Create new application".

- Give your application a name.
- Fill in the Redirect URI that the user should land on after authorizing the application.
- Click the "Save" button
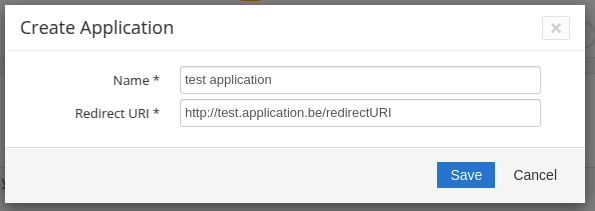
- The Client ID and Secret for the newly created application are displayed in a message box. Make sure to copy them, as they are only displayed once.
Auto Discovery
curl -X GET \
  https://login.clearfacts.be/.well-known/openid-configuration
{
    "issuer": "https://login.clearfacts.be",
    "authorization_endpoint": "https://login.clearfacts.be/oauth2-server/authorize",
    "token_endpoint": "https://login.clearfacts.be/oauth2-server/token",
    "userinfo_endpoint": "https://login.clearfacts.be/oauth2-server/userinfo",
    "jwks_uri": "https://login.clearfacts.be/oauth2-server/jwks.json",
    "response_types_supported": ["code", "token"],
    "subject_types_supported": ["public"],
    "id_token_signing_alg_values_supported": ["RS256"],
    "scopes_supported": ["openid", "profile", "email"]
}
OIDC has a way to configure clients automatically through a Discovery Document URL. The URL for this is defined by the OIDC spec and can be inspected manually if you'd like to see which features are supported in our implementation.
https://login.clearfacts.be/.well-known/openid-configuration
Authorization Code flow
OpenID connect (or OAuth2) supports several flows to obtain an access token.
Currently we only support the "Authorization Code Flow". This is the most commonly used and most secure flow, but it cannot be used by client-side only apps like javascript apps without a back-end. To learn more about how this works, click here.
Access Token
The token that you'll receive using OIDC is not a random byte string, but a signed JWT token that can be decoded
(see: jwt.io).
The JWT token contains the basic claims (sub, username, email) as well as an access token.
This is an access token, 80 character long, like you would get when manually creating a personal access token.
Both the JWT token and the access token can be used in the Authorization header.
Authorization: Bearer <token>
This means you can store either one depending on your use case.
Multiple Tokens
You can create multiple tokens for a user and application combination.
This is useful if your applications supports multiple workflows. For example:
- one for sign-in, only requiring basic user information
- another one for access to the user's archive
Using multiple tokens, your application can perform the authorization flow for each use case, requesting only the scopes needed.
The number of active tokens is limited to 10. If your application requests more than that, the least recently used tokens (with the same scopes being requested) will be revoked.
Scopes and Claims
The OAuth2 protocol is a delegated authorization mechanism, where a client application requests access to resources controlled by the user (the resource owner) and hosted by an API (the resource server). The authorization server typically issues the client application a more restricted set of credentials than those of the user.
Scopes
You can use scopes to:
- Authenticate users and get additional information about them (Type: OpenID)
- Request granular access control to the API (Type: API)
This is a list of all the supported scopes in our API:
| Scope | Type | Description |
|---|---|---|
openid |
OpenID | This is a technical scope, it should always be requested when using the OpenID Connect flow, it also allows access to a unique identification of the user (the sub claim) |
email |
OpenID | Access to a users emailaddress (via the /userinfo endpoint) |
profile |
OpenID | Access to a users name, locale |
accountant |
API | Consult the details of the accountant |
statistics |
API | Consult accountant statistics |
read_administrations |
API | Allows the client to query the list of administrations the user has access to |
associate_read |
API | Consult employees |
associate_actions |
API | Modify and create employees |
journal_read |
API | Consult the company's journals |
contact_read |
API | Consult the company's customers |
upload_document |
API | Allows the client to upload documents and invoices for the administrations the user has access to |
archive_read |
API | Consult the list of available archive categories |
archive_actions |
API | Making adjustments in archive |
archive |
API | Combination of archive_read and archive_actions |
Each token, be it a personal access token or a token acquired through OpenID Connect, should have been granted one or more scopes for it to be of any use.
If you are using OpenID Connect, you are required to request the openid scope.
Claims
OpenID Connect specifies a set of standard claims. These claims are user attributes and are intended to provide the client with the user's details such as email, name, and locale.
Requesting individual claims is not supported in our OIDC implementation.
Access to claims is regulated through scopes (openid, email, profile).
The /userinfo endpoint will return a json object with the claims.
| Claim | Type | Required scope | Description |
|---|---|---|---|
username |
string | openid | The username as used in Clearfacts. |
sub |
string | openid | Subject-identifier for the user in the Clearfacts. It contains the same value as the 'sub' claim. |
name |
string | profile | User's full name in displayable form including all name parts, possibly including titles and suffixes, ordered according to the user's locale and preferences. |
given_name |
string | profile | Given name(s) or first name(s) of the user. |
family_name |
string | profile | Surname(s) or last name(s) of the user. |
preferred_username |
string | profile | Shorthand name by which the user wishes to be referred to. |
email |
string | The user's e-mail address. Note: in most cases the username equals the email address. | |
locale |
string | profile | The user's locale, represented as a BCP47 [RFC5646] language tag. This is typically an ISO 639-1 Alpha-2 [ISO639‑1] language code in lowercase and an ISO 3166-1 Alpha-2 [ISO3166‑1] country code in uppercase, separated by a dash. For example, nl-BE. |
Granting and Revoking scopes
Personal Access Token
In case of a personal access token, the user can select which scopes to grant.
It's possible to grant or revoke scopes later on by editing or deleting the personal access token in the application.
OpenID Connect Token
When using OpenID Connect, tokens are issued to the client application any time the client application requests a token and the users approves.
This process is typically hidden from the user and this it's not possible to change the scopes for any existing token.
If a user wants to revoke rights from a client application he will need to remove the client application from within Clearfacts. At that point all tokens for this client application will be revoked at once.
Recipes
In this section we provide you with a variety of examples using GraphQL queries and mutations. That way you'll quickly be familiar with the usage and common use cases of our GraphQL schema and endpoint.
Due to the nature of GraphQL, the query or mutation you send determines the shape of the response you get back. This means that you can always request exactly the data you need, and nothing more. Our examples list a set of fields to request, but feel free to modify them to your own needs.
The exact contract for all of our queries and mutations are listed in our GraphQL Schema.
Query - Accountant
curl -H "Authorization: Bearer <token>" \
  -X POST \
  https://api.clearfacts.be/graphql
query accountant {
  accountant {
    name,
    companyNumber,
    email,
    address {
      streetAddress,
      country {
        iso2,
        name
      }
    }
  }
}
{
  "data": {
    "accountant": {
      "name": "Acme Company",
      "companyNumber": "0123123123",
      "email": "accountant@acme.be",
      "address": {
        "streetAddress": "Street 16",
        "country": {
          "iso2": "BE",
          "name": "Belgium"
        }
      }
    }
  }
}
This queries the accountant the user is linked to.
The list of potential arguments can be found on the Query page.
The result will be a singular Accountant object.
Query - Associates
curl -H "Authorization: Bearer <token>" \
  -X POST \
  https://api.clearfacts.be/graphql
query associates {
  associates {
    id,
    email
  }
}
{
  "data": {
    "associates": [
      {
        "id": "123e4567-e89b-12d3-a456-426614174000",
        "email": "account.manager@acme.be"
      }
    ]
  }
}
This queries the associates of the accountant the user is linked to.
The list of potential arguments can be found on the Query page.
The result will be a list of Associate objects.
Query - Associate Groups
curl -H "Authorization: Bearer <token>" \
  -X POST \
  https://api.clearfacts.be/graphql
query groups {
  associateGroups {
    id,
    name
  }
}
{
  "data": {
    "associateGroups": [
      {
        "id": "2ff2f0a8-3753-11e8-8c32-02907d97d1d8",
        "name": "Test Group"
      }
    ]
  }
}
This queries the associate groups of the accountant the user is linked to.
The list of potential arguments can be found on the Query page.
The result will be a list of AssociateGroup objects.
Mutation - Add Associate
curl -H "Authorization: Bearer <token>" \
  -X POST \
  https://api.clearfacts.be/graphql
  -F 'query=<query>' \
  -F 'variables={ "associate": { "firstName": "Test", "lastName": "Associate", "email": "associate@acme.be", "type": "ADMIN", "associateGroups": [{ "id": "2ff2f0a8-3753-11e8-8c32-02907d97d1d8" }], "active": true, "language": "nl_BE", "sendActivationMail": false } }'
mutation add ($associate: AddAssociateArgument!) {
  addAssociate (associate: $associate) {
    id,
    associateGroups {
      id,
      name
    },
    plainPassword
  }
}
{
  "data": {
    "addAssociate": {
      "id": "198772ef-d095-4859-9328-dc47950853b9",
      "associateGroups": [
        {
          "id": "2ff2f0a8-3753-11e8-8c32-02907d97d1d8",
          "name": "Test Group"
        }
      ],
      "plainPassword": "generatedPassword123"
    }
  }
}
This adds a new associate to the accountant the user is linked to.
The list of potential arguments can be found on the Mutation page.
The result will be a singular Associate object.
Mutation - Edit Associate
curl -H "Authorization: Bearer <token>" \
  -X POST \
  https://api.clearfacts.be/graphql
  -F 'query=<query>' \
  -F 'variables={ "id": "198772ef-d095-4859-9328-dc47950853b9", "associate": { "firstName": "Updated" } }'
mutation edit ($id: ID!, $associate: EditAssociateArgument!) {
  editAssociate (id: $id, associate: $associate) {
    id,
    firstName
  }
}
{
  "data": {
    "editAssociate": {
      "id": "198772ef-d095-4859-9328-dc47950853b9",
      "firstName": "Updated"
    }
  }
}
This edits an existing associate of the accountant the user is linked to.
The list of potential arguments can be found on the Mutation page.
The result will be a singular Associate object.
Query - Administrations
curl -H "Authorization: Bearer <token>" \
  -X POST \
  https://api.clearfacts.be/graphql
query admins {
  administrations {
    name,
    companyNumber,
    accountManager,
    emails {
      type,
      emailAddress
    }
    address {
      streetAddress,
      country {
        iso2,
        name
      }
    }
  }
}
{
  "data": {
    "administrations": [
      {
        "name": "Acme Company",
        "companyNumber": "0123123123",
        "accountManager": "account.manager@acme.be",
        "emails": [
          {
            "type": "purchase",
            "emailAddress": "aankoop-0123123123@acme.clearfacts.be"
          },
          {
            "type": "purchase",
            "emailAddress": "achat-0123123123@acme.clearfacts.be"
          }
        ],
        "address": {
          "streetAddress": "Street 16",
          "country": {
            "iso2": "BE",
            "name": "Belgium"
          }
        }
      }
    ]
  }
}
This queries all the administrations the user has access to.
The list of potential arguments can be found on the Query page.
The result will be a list of Administration objects.
Query - Administration
curl -H "Authorization: Bearer <token>" \
  -X POST \
  https://api.clearfacts.be/graphql
query admin {
  administration (companyNumber: "0123123123") {
    name,
    companyNumber,
    accountManager,
    emails {
      type,
      emailAddress
    }
    address {
      streetAddress,
      country {
        iso2,
        name
      }
    }
  }
}
{
  "data": {
    "administration": {
      "name": "Acme Company",
      "companyNumber": "0123123123",
      "accountManager": "account.manager@acme.be",
      "emails": [
        {
          "type": "purchase",
          "emailAddress": "aankoop-0123123123@acme.clearfacts.be"
        },
        {
          "type": "purchase",
          "emailAddress": "achat-0123123123@acme.clearfacts.be"
        }
      ],
      "address": {
        "streetAddress": "Street 16",
        "country": {
          "iso2": "BE",
          "name": "Belgium"
        }
      }
    }
  }
}
This queries a specific administration the user has access to.
The list of potential arguments can be found on the Query page.
The result will be a singular Administration object.
Mutation - Upload File
curl -H "Authorization: Bearer <token>" \
  -X POST \
  https://api.clearfacts.be/graphql
  -F 'query=<query>' \
  -F 'variables={ "vatNumber": "0123123123", "fileName": "test_upload.pdf", "invoiceType": "PURCHASE" }' \
  -F file=@/home/user/Documents/example.pdf
mutation upload ($vatNumber: String!, $fileName: String!, $invoiceType: InvoiceTypeArgument!) {
 uploadFile (vatnumber: $vatNumber, filename: $fileName, invoicetype: $invoiceType) {
   uuid,
   amountOfPages
 }
}
{
  "data": {
    "uploadFile": {
      "uuid": "B74D7E7D-2408-4517-AA31-BB76018E844D",
      "amountOfPages": 1
    }
  }
}
This mutation uploads a file to the Inbox of a specific administration the user has access to.
The list of potential arguments can be found on the Mutation page.
The result will be a singular File object.
The way in which we send this mutation differs a bit from regular queries. Since we have to provide a file as data, we will send our information as form-data instead of a text-based content-type like application/json or application/graphql.
The file must be present as a parameter named file, while the mutation and arguments can be provided as regular text-based
content in the form, respectively called query and variables.
Query - Document
curl -H "Authorization: Bearer <token>" \
  -X POST \
  https://api.clearfacts.be/graphql
query doc {
  document (id: "B74D7E7D-2408-4517-AA31-BB76018E844D") {
    date,
    ... on InvoiceDocument {
      type,
      paymentState
    }
  }
}
{
 "data": {
    "document": {
      "date": "2025-01-01",
      "type": "PURCHASE",
      "paymentState": "UNPAID"
    }
  }
}
This queries a specific document the user has access to.
It's only possible to query documents for which the ID is known.
The only way to get a document's ID is after the initial upload.
The list of potential arguments can be found on the Query page.
The result will be a singular InvoiceDocument object,
which extends from Document.
In our example we illustrate how to query these fields.
The date field is part of the Document, so you can query the field like you normally would.
The type and paymentState however are fields of the InvoiceDocument.
To query these fields we need to use inline fragments ... on InvoiceDocument.
Query - Archive Categories
curl -H "Authorization: Bearer <token>" \
  -X POST \
  https://api.clearfacts.be/graphql
query categories {
  archiveCategories (vatnumber: "0123123123") {
    various {
      id,
      name
    },
    permanent {
      id,
      name
    }
  }
}
{
  "data": {
    "archiveCategories": {
      "various": [
        {
          "id": "f5c3d05a-2d05-4329-ae31-3f144bfbeb41",
          "name": "Beleggingen"
        }
      ],
      "permanent": [
        {
          "id": "2fcff67d-3753-11e8-8c32-02907d97d1d8",
          "name": "Huurovereenkomst"
        }
      ]
    }
  }
}
This queries all the archive categories for a specific administration the user has access to.
The list of potential arguments can be found on the Query page.
The result will be a singular Categories object,
which contains the various and permanent properties.
Those contain an array of Category objects.
Mutation - Upload Archive File
curl -H "Authorization: Bearer <token>" \
  -X POST \
  https://api.clearfacts.be/graphql
  -F 'query=<query>' \
  -F 'variables={ "vatNumber": "0123123123", "fileName": "test_upload.pdf", "type": "VARIOUS", "category": "f5c3d05a-2d05-4329-ae31-3f144bfbeb41" }' \
  -F file=@/home/user/Documents/example.pdf
mutation upload ($vatNumber: String!, $fileName: String!, $type: VariousType!, $category: String!) {
 uploadArchiveFile (vatnumber: $vatNumber, filename: $fileName, type: $type, category: $category) {
   uuid,
   amountOfPages
 }
}
{
  "data": {
    "uploadArchiveFile": {
      "uuid": "B74D7E7D-2408-4517-AA31-BB76018E844D",
      "amountOfPages": 1
    }
  }
}
This mutation uploads a file to the Various or Permanent Archive of a specific administration the user has access to.
The list of potential arguments can be found on the Mutation page.
The result will be a singular File object.
This mutation is very similar to the Mutation - Upload File.
The category argument is an ID of a category retrieved using the Query - Archive Categories.
Query - Journals
curl -H "Authorization: Bearer <token>" \
  -X POST \
  https://api.clearfacts.be/graphql
query journals {
  journals (companyNumber: "0123123123") {
    id,
    name,
    creditNote
  }
}
{
  "data": {
    "journals": [
      {
        "id": "CFAK",
        "name": "ClearFacts Aankopen",
        "creditNote": false
      }
    ]
  }
}
This queries all the journals of a specific administration the user has access to.
The list of potential arguments can be found on the Query page.
The result will be a list of Journal objects.
Query - Customers
curl -H "Authorization: Bearer <token>" \
  -X POST \
  https://api.clearfacts.be/graphql
query customers {
  customers (companyNumber: "0123123123") {
    id,
    name
  }
}
{
  "data": {
    "customers": [
      {
        "id": "ACME",
        "name": "Acme Corporation"
      }
    ]
  }
}
This queries all the customers of a specific administration the user has access to.
For performance reasons, this list is paginated.
A maximum of 100 customers will be returned per request
If there are more customers to retrieve, you can use the offset argument to get the next page.
The list of potential arguments can be found on the Query page.
The result will be a list of BusinessPartner objects.
Query - Company Statistics
curl -H "Authorization: Bearer <token>" \
  -X POST \
  https://api.clearfacts.be/graphql
query statistics {
  getCompanyStatistics (type: "AIR", startPeriod: "2025-01-01", endPeriod: "2025-12-31") {
    companyNumber,
    items {
      period,
      value
    }
  }
}
{
  "data": {
    "getCompanyStatistics": [
      {
        "companyNumber": "BE0123123123",
        "items": [
          {
            "period": "01/2025",
            "value": 5
          }
        ]
      }
    ]
  }
}
This queries the company statistics of a specific administration the user has access to.
The main argument is the type of statistics you want to retrieve:
- AIR: (Automatic Invoice Recognition) how many invoices were recognised by our text recognition system
- processing: how many documents were processed through Clearfacts, into the accountant software
The list of potential arguments can be found on the Query page.
The result will be a list of CompanyStatistic objects.
One entry per administration, with a list of items, one per "month/year" period.
Mutation - Update App Info
curl -H "Authorization: Bearer <token>" \
  -X POST \
  https://api.clearfacts.be/graphql
  -F 'query=<query>' \
  -F 'variables={ "vatnumber": "0123123123", "imageUrl": "XXX", "emailAddress": "test@clearfacts.be", "badgeText": "NEW", "badgeTextColor": "#d5a855", "badgeColor": "red", "iconType": "trophy", "iconColor":"yellow" }'
mutation update ($vatnumber: String!, $imageUrl: String, $emailAddress: String, $badgeText: String, $badgeTextColor: String, $badgeColor: String, $iconType: String, $iconColor: String) {
  updateAppInfo (vatnumber: $vatnumber, imageUrl: $imageUrl, emailaddress: $emailAddress, badge: { text: $badgeText, textColor: $badgeTextColor, color: $badgeColor }, icon: { type: $iconType, color: $iconColor }) {
    vatnumber,
    imageUrl,
    emailaddress,
    icon { type, color },
    badge { text, textColor, color }
  }
}
{
  "data": {
    "updateAppInfo": {
      "vatnumber": "0123123123",
      "imageUrl" : "XXX",
      "emailaddress": "test@clearfacts.be",
      "icon": {
        "type": "trophy",
        "color": "yellow"
      },
      "badge": {
        "text": "NEW",
        "textColor": "#d5a855",
        "color": "red"
      }
    }
  }
}
You can create or update customization for the app connected to your integration.
If you want an app connected to your integration, please contact support at clearfacts dot be.
The list of potential arguments can be found on the Mutation page.
The result will be a singular AppInfo object.